Working and spending more time at home has recently gotten you more interested in gardening and growing your own vegetables. It has also been a pretty expensive pastime given the amount of materials, soil, and water needed to upkeep and grow a garden. You looked into cheaper alternatives and started learning more about hydroponics, however, that in itself is also pretty expensive to start. You figured you could build your own hydroponics system on your own for much cheaper. This is part one of a short series where you start your very first attempt at a hydroponics garden build.
You will provide a walkthrough and build process for a freestanding hydroponic grow garden tower that costs less than $150 to make. The video will also include an unboxing and review of the necessary tools and equipment used in the build. You will share your motivations for trying hydroponics, the cost-saving benefits, and the improved efficiency and convenience of this gardening method. Stay tuned for the entire build process and see how it turns out.
Materials Required
List of materials
Here is a list of materials that you will need for this DIY hydroponics garden tower project:
- Charlotte Pipe PVC Pipe 4-in 10-ft – $18.45
- Charlotte Pipe 1/2-in x 10-ft – $2.96
- 5-Gallon Plastic General Bucket – $3.75
- 4.25-in Drain Cover – $16.68
- 4 In. PVC Drain Cap – $2.48
- 4-in x 4-in Dia Schedule 40 Coupling – $2.91
- 1/2-in x 1/2-in dia Adapter Adapter PVC Fitting $0.55
- 4-in x 4-in Dia Schedule 40 Adapter – $8.48
- 4-in x 4-in Dia Schedule 40 Adapter – $6.48
- Yokgrass 800GPH Submersible Pump(3000L/H) – $21.99
- Garden 50 Pack Lightweight Economy Net Pot Cups – $8.95
- Pure Coconut Coir Netted Pellets 42mm (100 pack) – $23.99
Please note that this list does not include any tools you may need for the project.
Gear and equipment used
In addition to the materials listed above, here is a list of gear and equipment that I used for this hydroponics garden tower build:
- 12-inch miter saw from Cobalt
- 7-inch miter saw from Cobalt
- Saw blade specifically made for cutting PVC pipe
- Clear laminate material (for template)
- Pencil (for marking)
- Blue poster board (for template)
- Measuring tape
- Water pump for continuous water flow
These tools and equipment were essential for the construction process and ensured accurate and precise cuts.
Introduction to Hydroponics
Hydroponics is a revolutionary method of growing plants without soil. Instead, plants are grown in a nutrient-rich water solution, providing them with all the essential elements they need to thrive. This method offers several benefits over traditional gardening, such as increased plant growth and yield, reduced water usage, and the ability to grow plants in small spaces. By building your own hydroponic tower, you can have a sustainable and cost-effective way to grow fresh vegetables right at home.
Benefits of hydroponics
Hydroponic gardening offers numerous benefits that make it an attractive option for home gardeners. First and foremost, hydroponics allows for faster plant growth and higher yields compared to traditional gardening methods. This is because plants grown hydroponically have access to all the nutrients they need, delivered directly to their root systems. This efficiency leads to healthier and more robust plants.
Additionally, hydroponics is a water-saving technique. Because the water used in hydroponics is recirculated and reused, it requires significantly less water compared to traditional soil-based gardening. This is especially crucial in areas where water scarcity is a concern.
Another advantage of hydroponics is that it allows gardeners to grow plants vertically, maximizing the use of space. This makes it an ideal solution for urban dwellers or anyone with limited gardening space. By utilizing vertical stacking, you can grow a large number of plants in a small area, making efficient use of your available space.
Comparison to traditional gardening
Traditional gardening involves planting seeds or seedlings in soil, which acts as a medium for delivering water and nutrients to the plants’ roots. While this method has been used for centuries and is familiar to most people, it has its limitations.
One of the main drawbacks of traditional gardening is the reliance on soil quality. Soil can be inconsistent in its composition and nutrient content, leading to uneven growth and lower yields. Additionally, soil-based gardening requires regular watering, especially in hot and dry climates, which can be time-consuming and wasteful.
Hydroponics, on the other hand, eliminates the need for soil entirely. Plants are grown in an inert medium, such as coconut coir or perlite, with the necessary nutrients provided through the water solution. This allows for precise control over nutrient levels and pH, ensuring optimal plant health and growth.
Importance of saving money and space
One of the primary motivations for embarking on a DIY hydroponics project is the potential to save money. Traditional gardening can be costly due to the ongoing expenses of purchasing soil, fertilizers, and water. By building your own hydroponics system, you can significantly reduce these expenses over time. With careful planning and smart material choices, you can construct a hydroponic tower for less than $150, as demonstrated in this project.
Space-saving is another crucial aspect of hydroponics. Vertical growing systems, like the one being built in this project, use minimal floor space while maximizing the number of plants that can be grown. This is particularly advantageous for people living in apartments or houses with limited outdoor space. By utilizing vertical stacking, you can have a thriving garden even in a small backyard, patio, or balcony.

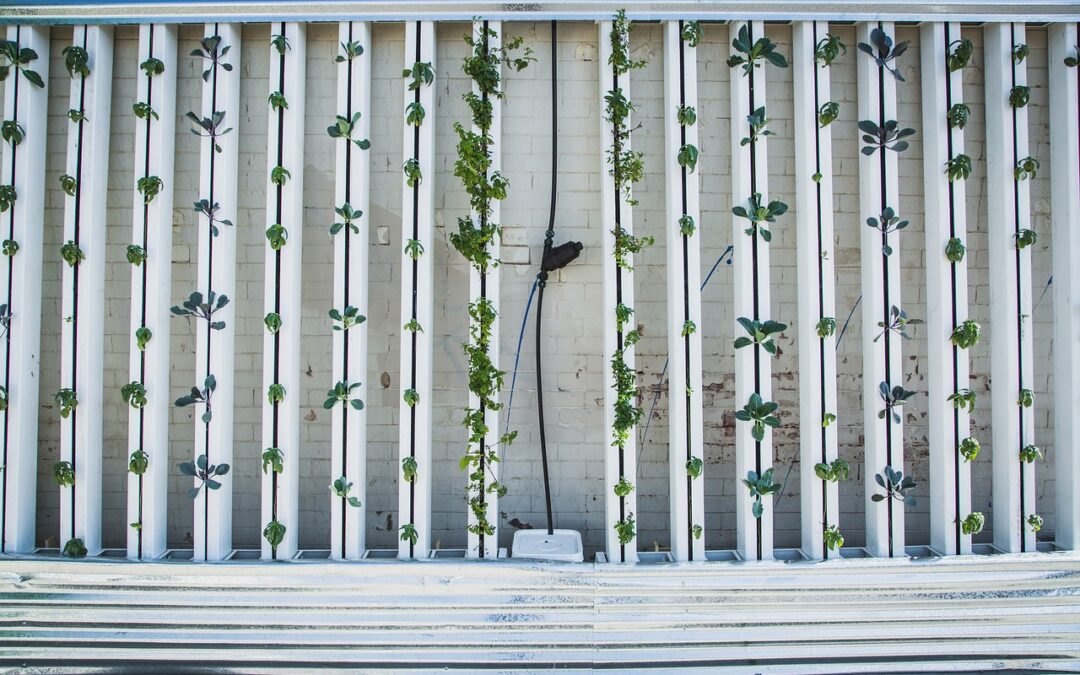
Building the Hydroponic Tower
Building a hydroponic tower may seem intimidating at first, but with the right tools and a step-by-step process, it can be a rewarding and straightforward project. In this section, we will walk through the construction process, from unboxing the tools to shaping the PVC pipe and creating the tower structure.
Walkthrough and unboxing of tools
To begin the project, it is essential to gather all the necessary tools and supplies. In the video, a 12-inch miter saw from Cobalt was used for cutting the PVC pipe with precision. This larger miter saw allowed for faster cuts and increased efficiency. Additionally, a saw blade specifically designed for cutting PVC pipe was used to ensure clean and accurate cuts.
The author also mentioned using a clear laminate material to create a template for marking the locations of the plant pots on the PVC pipe. While the ideal material would be clear laminate, the author used blue poster board as an alternative. This template helps ensure uniformity and proper spacing of the plant pots.
Cutting and shaping the PVC pipe
Once the tools and supplies are ready, the next step is to cut and shape the PVC pipe. The author used a 5-foot, 4-inch PVC pipe for the primary structure of the hydroponic tower. This size allows for three to four plant pots to be placed in each row, providing enough space for root growth and water flow.
To accurately mark the locations of the plant pots, the author created a guide using the template described earlier. By tracing the slits on the guide onto the PVC pipe, the author ensured consistent spacing between each pot. This step is crucial for optimal plant growth and nutrient delivery.
After marking the locations, the author used the miter saw with the appropriate blade to cut the holes for the plant pots. It is essential to proceed with caution and follow proper safety procedures when using power tools. The result should be perfectly aligned holes that will accommodate the net pot cups holding the plants.
Creating the tower structure
Once the holes are cut, the PVC pipe can be assembled to create the tower structure. The author chose a height of five feet for the tower, allowing for ease of access and visibility. It is important to remember that the tower should not directly touch the ground to prevent the plants from coming into contact with the soil and potential contaminants.
To secure the pipes together, PVC fittings and adapters were used. The author mentioned using 1/2-inch x 10-ft Charlotte Pipe and various Schedule 40 adapters. These fittings ensure a tight and stable connection between the PVC pipes, creating a sturdy structure to support the weight of the plants.
Importance of proper spacing
Proper spacing between the plant pots is essential for maintaining healthy plant growth. In hydroponics, adequate spacing allows for optimal air circulation, prevents overcrowding, and ensures that each plant receives enough light and nutrients.
The template used earlier helps achieve uniform spacing between the plant pots. By following the marked lines, you can ensure that the pots are evenly distributed along the height of the tower. This arrangement allows for proper root development and water distribution, promoting healthy and vigorous plant growth.
Setting up the Water System
After constructing the hydroponic tower, the next step is to set up the water system. This system is responsible for delivering the nutrient-rich water solution to the plants.
Attaching the water feeding tube
To ensure a continuous supply of water to the plants, a water feeding tube needs to be attached to the tower. The author did not provide specific details about the water feeding tube used, but it can be assumed that it is a flexible tube connected to a water pump.
The water feeding tube should be positioned at the top of the tower, allowing water to flow down through the plant pots and back into the reservoir. By setting up the water feeding tube correctly, you can ensure that each plant receives an adequate amount of water and nutrients.
Setting up the water reservoir
The water reservoir is where the nutrient solution is stored and recycled throughout the hydroponic system. In the video, a 5-gallon plastic general bucket was used as the water reservoir. This size is sufficient for a small-scale hydroponic tower.
To set up the water reservoir, it needs to be placed at the base of the tower. The water feeding tube should be connected to the reservoir, allowing water to be pumped up and circulated through the tower. It is important to choose a location for the reservoir that is stable and easily accessible for maintenance and nutrient solution changes.
Adding liquid nutrient to the water
The final step in setting up the water system is adding liquid nutrient to the water. Plants grown hydroponically rely on nutrient-rich solutions in place of soil for their growth. It is crucial to provide them with the necessary elements for healthy development.
The author did not provide specific information about the type of liquid nutrient used in the video, but there are numerous commercially available hydroponic nutrient solutions designed to meet the specific needs of different plants. It is essential to follow the recommended dosage and instructions provided by the manufacturer when adding nutrients to the water.
Future Design Improvements
While this hydroponic tower build project was successful, there is always room for improvement and further enhancements. In this section, we will discuss plans for future design improvements, the possibility of selling the towers, and the author’s commitment to providing updates on progress.
Plans for further enhancement
Building a hydroponic garden tower is an ongoing process of learning and improvement. After the initial build, you may discover areas that could be enhanced or modified for better results. This could include optimizing plant spacing, experimenting with different nutrient solutions, or implementing advanced automation systems.
The author, Chris Loh, expressed their plans for further enhancing their hydroponic garden tower. It is important to continue researching and staying up-to-date with the latest advancements in hydroponics to ensure the best possible results.
Possibility of selling the towers
As the author gained experience and confidence in their hydroponic tower builds, they mentioned the possibility of selling the towers. This highlights the potential for turning this DIY project into a small business opportunity.
By refining the design, optimizing the production process, and sourcing cost-effective materials, it may be feasible to offer hydroponic towers for sale to others who are interested in starting their own home gardens. This not only provides an opportunity for financial gain but also promotes the benefits of sustainable and space-saving gardening.
Updates on progress in a follow-up video
To keep viewers informed and engaged, the author plans to provide updates on the progress of their hydroponic tower in a follow-up video. These updates will showcase the growth and development of the plants, highlight any modifications or improvements made to the system, and share valuable insights gained throughout the process.
The follow-up video will serve as a source of inspiration and information for anyone interested in pursuing their own hydroponic garden project. It provides an opportunity to learn from the author’s experiences and discover new ways to optimize plant growth and maximize the potential of hydroponics.
Conclusion
Building a DIY hydroponics garden tower offers an affordable and space-saving solution for growing your own vegetables at home. By utilizing readily available materials and following a step-by-step construction process, you can create a sustainable and efficient system for plant growth.
Hydroponics offers numerous benefits over traditional gardening, including faster plant growth, higher yields, and reduced water usage. By building your own hydroponic tower, you can save money, make the most of limited gardening space, and enjoy fresh and healthy vegetables year-round.
This article has provided a comprehensive overview of the materials required, the construction process, setting up the water system, future design improvements, and the potential for selling hydroponic towers. Remember to stay curious, continue learning, and share your own progress with others in this exciting and innovative field of gardening. Happy growing!
Working and spending more time at home has recently sparked your interest in gardening and growing your own vegetables. However, it can be quite expensive to maintain and grow a traditional garden with all the materials, soil, and water required.
To find a more affordable solution, you started looking into hydroponics. Unfortunately, even starting a hydroponics system can be costly. But you realized that you could build your own hydroponics garden system for much less money.
In this short series, I will share my experience of building my very first hydroponics garden.
I have created a PVC cutting template that you can download from my website at https://clohofficial.com/ in the downloads section.