In the video titled “World’s Most Simple $5 DIY Hydroponic Setup QUICK EZ & CHEAP” by MIgardener, you will learn about a simplified and cost-effective method of hydroponic gardening. This setup, which can be made for under $5, is suitable for both beginners and advanced hydroponic growers. The video provides step-by-step instructions on creating this DIY version of a bucket hydroponic setup using materials such as a bubbler, air stones, net cups, and rock wool. The speaker emphasizes the importance of artificial lighting for indoor gardening and recommends planting high return crops like kale and lettuce. Overall, this video is a great introduction to the world of hydroponics and encourages viewers to give it a try for themselves.
Introduction
Welcome to the world of hydroponics! In this article, we will explore the benefits of setting up your own DIY hydroponic system. Whether you are a beginner or an advanced grower, this affordable and simple setup will allow you to grow your own fresh vegetables right at home. We will also provide a step-by-step guide on how to create a $5 bucket hydroponic setup. So, let’s dive in and discover the wonders of hydroponic gardening!
Benefits of DIY Hydroponic Setup
Affordability
One of the key benefits of a DIY hydroponic setup is its affordability. Traditional gardening methods can often be costly and require purchasing various equipment and materials. However, with a homemade hydroponic system, you can save money by using readily available and inexpensive materials. Our $5 bucket hydroponic setup proves that you don’t need to break the bank to enjoy the benefits of hydroponics.
Suitability for Beginners and Advanced Growers
Whether you are a complete beginner or an experienced grower, a DIY hydroponic setup is suitable for everyone. As a beginner, this setup allows you to learn the basics of hydroponics without the need for complex systems. Advanced growers can also benefit from this setup by experimenting with different crops and techniques in a cost-effective way.
Hands-on Experience
Setting up your own hydroponic system provides you with a hands-on experience in gardening. From drilling the holes to setting up the air pump, every step allows you to learn and understand the fundamentals of hydroponics. This DIY approach empowers you to take control of your own food production and develop valuable skills along the way.
Encouragement to Try Hydroponics
By embracing a DIY hydroponic setup, you are encouraged to try hydroponics and experience its numerous benefits. Hydroponics offers a sustainable and efficient way of growing plants without soil, which can be especially valuable for urban dwellers or those with limited garden space. So why not give hydroponics a try and unlock a whole new world of plant cultivation?
Understanding Hydroponics
Definition and Concept
Hydroponics is a method of growing plants without soil, using a nutrient-rich water solution as the growing medium. Instead of relying on traditional gardening methods, hydroponics allows the plants to receive essential nutrients directly through water. This method promotes faster growth and higher yields, as plants can absorb nutrients more efficiently in a controlled environment.
Advantages of Hydroponics
One of the main advantages of hydroponics is its ability to conserve water. Unlike traditional gardening, hydroponics uses a recirculating system that minimizes water waste. Water is continuously recirculated throughout the system, reducing the amount of water needed for plant growth. Additionally, hydroponic systems can be set up indoors, enabling year-round cultivation regardless of outdoor weather conditions.
Importance of Artificial Lighting
When practicing hydroponics indoors, artificial lighting plays a crucial role in plant growth. Unlike outdoor gardening, where plants can rely on natural sunlight, indoor hydroponics requires the use of artificial lights to mimic the sun’s rays. High-quality LED lights or high-intensity discharge (HID) lights provide the necessary spectrum and intensity for optimal plant growth. Proper lighting ensures that plants receive the energy they need for photosynthesis and healthy development.
Speaker’s Experience with Large-Scale Hydroponics
Before we delve into the $5 bucket hydroponic setup, let’s take a moment to hear about the speaker’s experience with large-scale hydroponics. The speaker has successfully implemented a large-scale hydroponic system and emphasizes its efficiency and productivity. They have embraced hydroponics on a larger scale and have seen impressive results, supporting the claim that hydroponics is a viable method for food production.
Introducing the $5 Bucket Hydroponic Setup
Now, let’s get into the details of the $5 bucket hydroponic setup. This simple and cost-effective method allows you to start your hydroponic journey without breaking the bank. Here are the materials you will need:
Materials Needed
- A bucket with a lid (preferably food-grade)
- Bubbler
- Air stones
- Net cups
- Rock wool
Steps for Setting Up
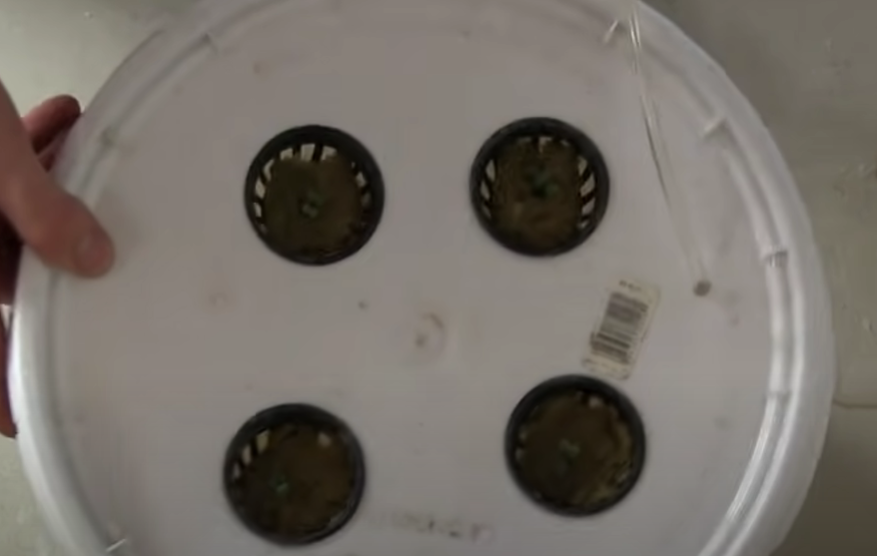
- Drilling Holes in the Bucket: Using a two-inch circle bit, drill four holes in the bucket’s lid. These holes will hold the net cups, which will house the plants.
- Feeding Air Tubing Through the Holes: Drill an additional hole in the bucket’s side to feed the air tubing through. This will allow the air stone to reach the bottom of the bucket, ensuring proper aeration.
- Setting Up the Air Pump: Connect the air tubing to the air pump and place the air stone at the end of the tubing. The air pump will provide essential oxygen to the roots, promoting healthy growth.
Materials Needed for the Setup
To create an efficient and effective hydroponic system, it’s essential to gather the necessary materials. Here are the materials you will need for the $5 bucket hydroponic setup:
Bubbler
The bubbler is a key component of the setup, as it provides aeration and oxygenation to the water. Look for a small, low-pressure bubbler, which can be found at most big-box stores or aquarium supply shops. These are easily accessible and affordable.
Air Stones
Air stones are essential for distributing air evenly throughout the water in the bucket. These stones help in oxygenation and promote healthy root growth. They can be purchased for a low cost, typically around $1-$2 per stone.
Net Cups
Net cups are the holders for the plants in the hydroponic system. These cups allow the plant’s roots to grow into the nutrient-rich water. Net cups can be purchased, but you can also create your own by cutting slits into plastic cups. Four net cups will be needed for our $5 bucket hydroponic setup.
Rock Wool
Rock wool acts as a growing medium for the plants in the hydroponic system. It provides support for the plants’ roots and retains moisture. Rock wool is inexpensive and can be purchased in bulk, making it a cost-effective option for this setup.
Steps for Setting Up the Bucket Hydroponic Setup
Now that we have gathered all the required materials let’s walk through the step-by-step process of setting up the bucket hydroponic system:
Drilling Holes in the Bucket
Using a two-inch circle bit, carefully drill four holes in the lid of the bucket. These holes should be evenly spaced to accommodate the net cups, which will hold the plants. Take your time to ensure clean and precise holes.
Feeding Air Tubing Through the Holes
Next, drill an additional hole in the side of the bucket, near the bottom. This hole will be used to feed the air tubing through. The air tubing connects the air pump to the air stone and allows for proper aeration of the water. Make sure the tubing fits snugly in the hole to avoid any air leaks.
Setting Up the Air Pump
Attach one end of the air tubing to the air pump and place the air stone at the other end. The air pump will provide a steady stream of oxygen to the water, ensuring that the plants’ roots receive the necessary nutrients.
Choosing High Return Crops for Hydroponics
Now that your $5 bucket hydroponic setup is ready, it’s time to choose the right crops to grow. To maximize the return on your investment, we recommend planting high return crops that are in high demand and expensive in stores. Here are two great options:
Kale
Kale is a nutrient-rich leafy green vegetable that is gaining popularity due to its health benefits. It grows well in hydroponic systems and can produce two pounds of leaves per month. Considering the average cost of kale in stores, growing your own kale can save you money and provide a fresh supply of this superfood.
Lettuce
Lettuce is another high return crop that thrives in hydroponic setups. With proper care and maintenance, lettuce can be continuously harvested, allowing for a steady supply of fresh salad greens. Hydroponically-grown lettuce often has a superior taste and texture compared to store-bought varieties.
Expanding the Setup
Once you have mastered the $5 bucket hydroponic setup, you may want to expand your system and try growing more plants. Here are some tips for expanding your hydroponic setup:
Setting Up Multiple Buckets
To increase your hydroponic yield, consider setting up multiple buckets. Each bucket can house different crops, allowing for a diverse and bountiful harvest. Connect all the buckets to a single air pump using individual air tubing for each bucket.
Using a 3-Way Connector
To streamline the setup of multiple buckets, you can use a 3-way connector. This connector allows you to split the main air tubing into multiple lines, ensuring each bucket receives proper aeration. This setup minimizes the number of air pumps needed and simplifies the overall system.
Conclusion
Congratulations on completing your DIY hydroponic setup! By following the steps and using affordable materials, you have created a cost-effective way to grow your own food. Hydroponics offers numerous benefits, including water conservation, year-round cultivation, and high return on investment. Whether you are a beginner or an experienced grower, hydroponics provides a fun and rewarding way to embrace gardening. Remember to experiment with different crops and techniques to fully enjoy the benefits of your hydroponic system. Happy gardening, and we encourage you to share your hydroponic journey with others.
Encouragement to Try Hydroponics
We hope this article has inspired you to try hydroponics and explore the possibilities of indoor gardening. With a DIY hydroponic setup, you can enjoy the convenience of growing your own fresh vegetables at home. Hydroponics offers a sustainable and efficient way to cultivate plants, and the $5 bucket hydroponic setup is a great starting point. So why not give it a try and experience the joy of growing your own food?
Check out the MIGardener channel on Youtube for more hydroponics and gardening info.